Microsoft 365 offers greater flexibility in how users and organizations can acquire and assign licenses. And we’ve got two main routes:
- The classic way where IT admins buy and assign licenses for users.
- The modern way: Self-service purchases in Microsoft 365. Here, end-users can hop in and buy the certain services they need without bugging the IT team!
While the classic method keeps control in the hands of admins (less risk, more order), self-service purchases can stir up quite a bit of chaos if left unchecked.
Let’s explore the second option, self-service purchases, how it works, and the best ways to manage it effectively.
What is Self-Service Purchases in Microsoft 365?
Self-service purchase in Microsoft 365 allows individual users within an organization to directly buy *certain Microsoft services or subscriptions, such as Copilot, Power BI pro without needing IT admin approval.
| *certain Microsoft services – not all products are up for grabs. Microsoft occasionally releases a curated list for self-purchase. The latest? Teams Premium, Copilot, and Clipchamp. Right now, users can also self-purchase Power BI, Power Automate, Power Apps, and Copilot. |
Even though these purchases are billed directly to the user’s credit card, admins still have full visibility and control. You can monitor and manage self-service purchases to make sure they align with your organization’s policies. It’s flexibility for users with oversight for admins – best of both worlds, I feel!
What’s Right – Enable or Disable Self-service Purchases?
This is the question that’s mostly debated! So, let me settle the debate from my side here. While it’s convenient, enabling self-service purchases can lead to chaos.
- Like scattered subscriptions, and users buying tools that don’t meet security or compliance standards.
- On top of that, managing those licenses later becomes a great headache! You’ll find yourself tracking who bought what, consolidating subscriptions, and fixing unexpected issues.
So, the best move is to disable self-service purchases. This gives admins full control over spending, compliance, and license management.
How to Disable Self-Service Purchases in Microsoft 365 Admin Center
So, if you are still having second thought, here are 4 solid reasons that’ll convince you to disable self-service purchases ASAP!
- You can make sure your users get the right licenses that match your organization’s standards.
- You can limit exposure to unauthorized or unnecessary tools that could introduce risks.
- You can take control of the license management, otherwise you would end up in difficulty license tracking.
- You can prevent unexpected expenses and prevent over-spending users.
Should I say more, still?! Lemme know in comments.
The good news of all is thankfully, Microsoft recently introduced a portal to manage self-service purchases directly from the Microsoft 365 Admin Center itself.
- Open Microsoft 365 admin center
- Click on ‘Settings drop down and select ‘Org settings’
- Scroll down to Self-service trials and purchases.

- And here opens the new page Microsoft introduced! You’ll see a list of self-purchasable products. Click one to manage its settings and their current status of whether it is allowed or not.

- Now, if you want to disable a self-service purchase capability for a particular license, click on that license, and wait for the flyout pane to open. Here, you will have 3 options to select from.
- Allow self-service purchases: Users can buy the service.
- Allow trials only: Users can test it for free but can’t pay for it.
- Do not allow: Completely disable self-service purchases (my personal favorite!).
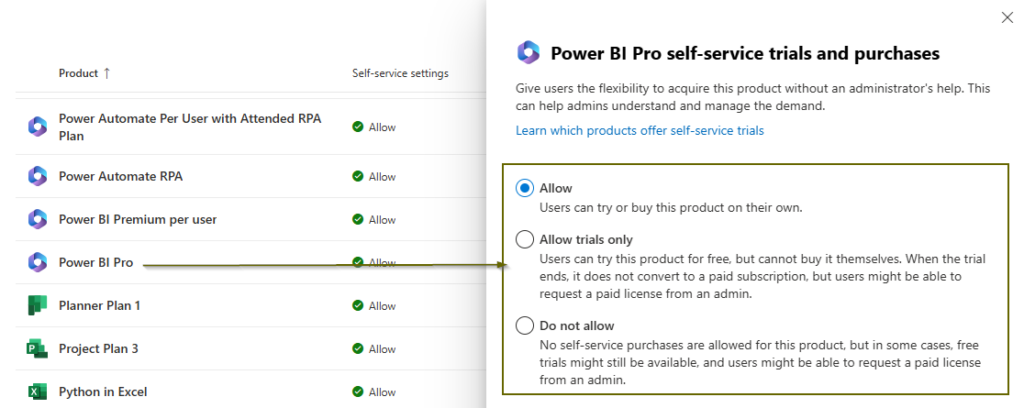
- Go with ‘Do not allow’ to disable self-service purchases for all products. Sadly, Microsoft doesn’t have a tenant-wide option, so you’ll need to do this for each product – painful, but totally worth it!
Note: Not that, Microsoft gave a portal, this 2024, Microsoft announced that if any user grabs a self-service license, admins will get a notification. (Global and billing admins would receive the notifications)
Disable Self-Service Purchases for All Microsoft 365 Services Via PowerShell
It’s hard that there is no directly to disable for all products at once in UI, but my love, PowerShell didn’t say NO to me. Use this simple PowerShell script to disable self-service purchases for all Microsoft products at once.
Connect-MSCommerce
Get-MSCommerceProductPolicies -PolicyId AllowSelfServicePurchase |
    Where-Object { $_.PolicyValue -eq "Enabled" } |
    ForEach-Object {
        Update-MSCommerceProductPolicy -PolicyId AllowSelfServicePurchase -ProductId $_.ProductID -Enabled $false
    }
Write-Host "Self-service purchase has been disabled for all applicable Microsoft products"
Once you’ve bulk disabled self-service purchases, you can verify in the admin center that all products are set to ‘Do not allow.’
However, if a new product is announced later, you’ll need to disable it manually! 😐For example, to disable self-service purchases for Microsoft Copilot, replace the ‘product name’ with the correct name and run the command below.
$productName = "Microsoft 365 Copilot"
$product = Get-MSCommerceProductPolicies -PolicyId AllowSelfServicePurchase | Where-Object { $_.ProductName -eq $productName }
if ($product) {
    Update-MSCommerceProductPolicy -PolicyId AllowSelfServicePurchase -ProductId $product.ProductID -Enabled $true
    Write-Host "Self-service purchase disabled for $productName."
} else {
    Write-Host "'$productName' not found."
}
If this feels tricky, identify the product ID of the new service, update the product ID parameter, and disable it.
End-user Experience After Self-service Trial & Purchase Disable:
When self-service trials and purchases are disabled, users attempting to start a trial or make a purchase will see the following message during the process.

How to Remove Users Self-Service Purchase Licenses?
I hear you wondering how to see who’s bought licenses and manage them. Well, that’s easy to find to do. To streamline license management and avoid scattered subscriptions, you can do any two of the below.
- Move users to a different subscription
- Take over and cancel a self-service subscription
Move Users to a Different Subscription:
This method may cost you more upfront, but it’s a great way to ensure security. So, you decide, what to do, after reading the two methods. Here’s how to move users to a different subscription:
- In the Admin Center, go to Your products and filter by Self-service to find the subscription.
- Select the subscription you want to take over and click Take control of this subscription.
- In the details pane, select Move users.
- Then choose the new product and hit Move users.
- After this, you’ll see Deleted on the subscription details page for the purchase.
No need to cancel the old subscription manually – when you move users to a new one, they’ll automatically get an email saying the old subscription was canceled.
Cancel an Existing Self-service Subscription
This is the simplest of all. If you don’t want to spend money on a license that doesn’t benefit you, just cancel it.
- In the Admin Center, go to Your products and filter by Self-service to find the subscription.
- Select the subscription you want to cancel, then click Take control of this subscription.
- In the details pane, select Cancel subscription.
- Provide a reason for the cancellation, confirm your choice, and complete the process.
Once done, the subscription status will show as Deleted, and users will lose access to the service. Simple!
Wrapping Up
Self-service purchases are convenient but can quickly spiral out of control without proper checks. My advice? Keep it simple – disable self-service purchases and manage everything centrally.
So, what do you think? Is this feature a blessing, a headache, or a mix of both? Share your thoughts in the comments below!

