In a day, we switch between dozens of apps, logging into platforms left, right, and center. But what happens when it comes to accessing sensitive data or high-risk actions? You might treat it as just another login. 😐But honestly, that’s exactly what makes us vulnerable. Attackers are waiting to exploit single sign-on (SSO) vulnerabilities and steal your tokens!
Just because someone logged in earlier doesn’t mean they’re still the same person behind the screen. Token theft is a very real threat. That’s why I personally think adding a second layer of protection (aka reauthentication) when accessing sensitive data is non-negotiable.
In this post, I’m going to break down why reauthentication matters, how it works, and how you can set it up in Microsoft 365 for those high-risk actions and apps. Let’s learn together!
Why Prompt Users to Reauthenticate?
So, why do we even need reauthentication prompts? The answer is simple! Not all apps or actions are created equal, and each one comes with its own level of security risk.
For example, accessing sensitive customer data, downloading confidential files, or performing high-impact administrative actions all require a bit more checking to make sure the person doing it is actually the right person. Without reauthentication, it’s way too easy for attackers to take advantage of session tokens and sneak in, especially when you’re using Single Sign-On (SSO). 🚨
When we prompt users to reauthenticate, they have to sign in again. 🆕That means a fresh set of credentials and a new token are created, which gives that extra layer of protection.
To make this reauthentication process intelligent and seamless, Microsoft Entra ID and Conditional Access helps us.
How to Prompt Reauthentication in Microsoft 365
Alright, now that we understand why reauthentication is so important, let’s get into the fun part—setting it up in Microsoft 365. 😁Luckily, Microsoft makes this process pretty easy with Conditional Access policies.
With Conditional Access in Microsoft Entra, you can set up reauthentication dynamically, based on things like strange login activity or when someone’s accessing high-risk apps.
For this walkthrough, I’ll show you how to set up a policy that prompts for reauthentication when a user tries to access a sensitive SharePoint site that holds financial reports. Because seriously, no one wants unauthorized hands on those numbers!
Things you need to get it ready before: Create an authentication context and apply it to the specific SharePoint site. Don’t worry, I’ll save that explanation for another time.
Step 1: Open the Microsoft Entra admin center.
Step 2: Head to Identity ➣ Protection ➣ Conditional Access.
Step 3: Click on Create new policy and give it a name like “Reauthentication for Highly Sensitive Sites” – something clear and easy to recognize.
Step 4: In the Target Resources section, choose the authentication context you’ve already applied to your site.

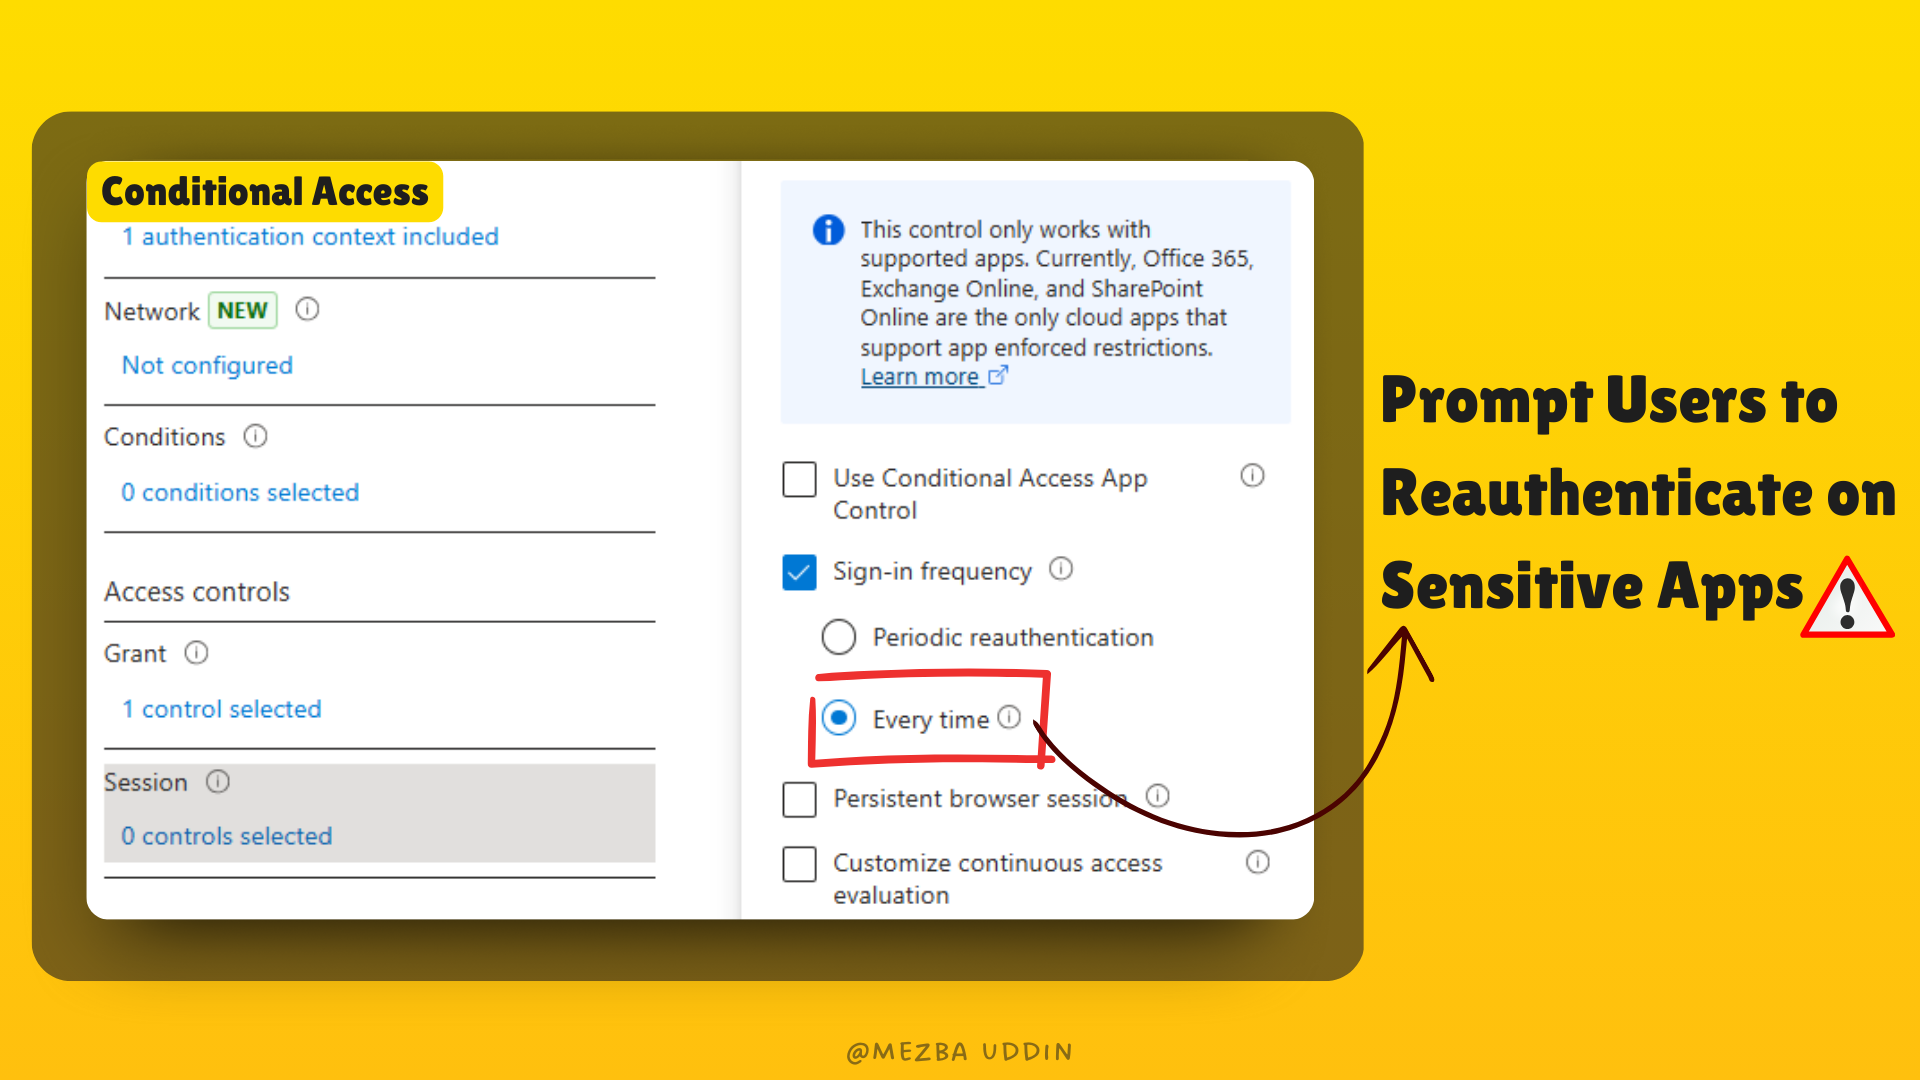
Step 5: This is the key part—Enforce Reauthentication:
- Under Access controls, select Grant. Then, check the box that says Require authentication strength and pick your preferred MFA method.

2. Now, we have to define session controls. In the Sign-in frequency checkbox, select every time.

Step 6: And that’s it! Your policy is all set up.
Before rolling this out to everyone, though, I recommend testing it with a small group first. Use the What If tool (I already wrote about it here) to simulate different scenarios and make sure everything’s working smoothly. Once you’re confident it’s doing what you want, apply it to the whole user base.
Pro Tips for a Seamless User Experience😎
By now, you’re probably thinking, “Okay, this sounds great, but is it worth the effort?” And trust me, I get it! But yes, it totally is. While reauthentication definitely strengthens security, we’ve got to be mindful not to overdo it. Here are a few tips I’ve picked up along the way to make sure it stays smooth for everyone:
- Be Selective: Apply reauthentication only to high-risk scenarios or sensitive apps. Overusing it can frustrate users. Overusing it can just annoy users, and that’s definitely not the goal.
- Communicate Clearly: Let users know why they’re being prompted. A simple message like, “We just need to confirm it’s really you for your security” can make all the difference in avoiding confusion.
- Deploy Risk-Based Policies: Use risk-based conditional access to prompt reauthentication only when it’s absolutely necessary, like when there’s a risky sign-in attempt.
These little tweaks will help keep things secure without driving your users crazy.
Monitor Reauthentication Events in Entra Sign-in Logs
Here’s something I’ve learned the hard way: setting up configurations is just the first step. You also need to keep an eye on how those policies are actually working
Microsoft Entra ID gives you detailed logging and reporting tools that let you monitor and audit reauthentication events.
- The Sign-in logs in the Entra admin center shows you exactly when and why reauthentication prompts were triggered. You can identify patterns, such as frequent reauthentication failures from specific users or unusual locations, which may indicate potential security risks. These are things that could signal potential security risks, like someone trying to bypass security. Definitely a red flag!
- On top of that, you can use Workbooks in Microsoft Entra to visualize these logs, combining reauthentication data with other Conditional Access insights for a holistic security overview.
By regularly checking these logs, you can fine-tune your Conditional Access policies to keep them effective without making them too strict. This visibility not only strengthens security but also helps when you need to justify your decisions to stakeholders or respond to audits.
Benefits of Reauthentication Prompts for Microsoft 365 Users
Reauthentication isn’t just about making users type in their passwords more often; it’s about protecting data and ensuring that only those who are authorized can take action. Here are some of the benefits I’ve found that really make it worth the effort:
1. Mitigates Risk of Session Hijacking – If a user leaves their session open or someone gains unauthorized access, reauthentication forces them to prove their identity before continuing. This helps prevent session hijacking and keeps things secure.
2. Protects Against Insider Threats – Even in trusted environments, reauthentication adds an extra layer of security, ensuring sensitive actions aren’t taken without verification.
3. Supports Compliance Requirements – For businesses that handle sensitive data, compliance is often non-negotiable. Regulations like GDPR or HIPAA require companies to take extra precautions with personal data. By using Conditional Access and reauthentication, businesses can stay on top of those requirements, ensuring data stays safe and compliant.
In my experience, reauthentication is one of those small changes that can make a big difference in security without creating too much hassle for users.
My last thoughts for you!
And that’s a wrap on everything you need to know about reauthentication in Microsoft 365. It’s not just another task on your IT checklist—this stuff really makes a difference in keeping your organization secure..
Remember, the goal isn’t to create barriers but to find that sweet spot. A little extra verification goes a long way in making sure sensitive apps and actions are only accessible by the right people.
Now it’s time for you to take action. Go ahead and set up that reauthentication policy. If you’ve got any questions or need a hand, feel free to drop them in the comments—I’d love to help out.


