Have you ever found yourself scratching your head, wondering why that important email from a trusted contact went straight to the junk folder? Or why a known spammy email somehow sneaked its way into your inbox?
If you’re nodding along, you’re not alone. But guess what? Microsoft just rolled out a new tool to put these frustrations to rest—and it’s all built right into the admin centers itself. Let’s dive into how you can diagnose and resolve Safe/Blocked Sender issues directly from the Microsoft 365 admin center.
Why Do Safe/Blocked Sender Issues Happen?
Before jumping into the solutions, let’s quickly break down the problem. Safe and Blocked Sender lists are designed to give you control over your email flow. When you mark someone as “safe,” you’re basically telling Microsoft 365, “Let this person’s emails through—no questions asked.” On the other hand, adding someone to the Blocked Sender list is like saying, “I’m done—don’t let this sender’s emails near my inbox ever again.”
Well, here’s where things can get a little messy. Despite adding someone to your Safe Sender list, their emails might still land in junk. Or, despite blocking a sender, their messages might still show up in your inbox. These mismatches can happen for a bunch of reasons:
- Conflicting policies: Your organization’s email settings might override your personal preferences.
- Complex filtering rules: Microsoft’s spam filters might still flag a safe sender as suspicious based on certain criteria.
- User errors: Accidentally marking a safe sender as spam (or vice versa) can happen to the best of us.
The good news is that Microsoft knows these things can happen, and they’ve given us a helpful tool to figure out what’s going on.
What Can the New Mailbox Safe/Blocked Sender List Diagnostic Tool Do?
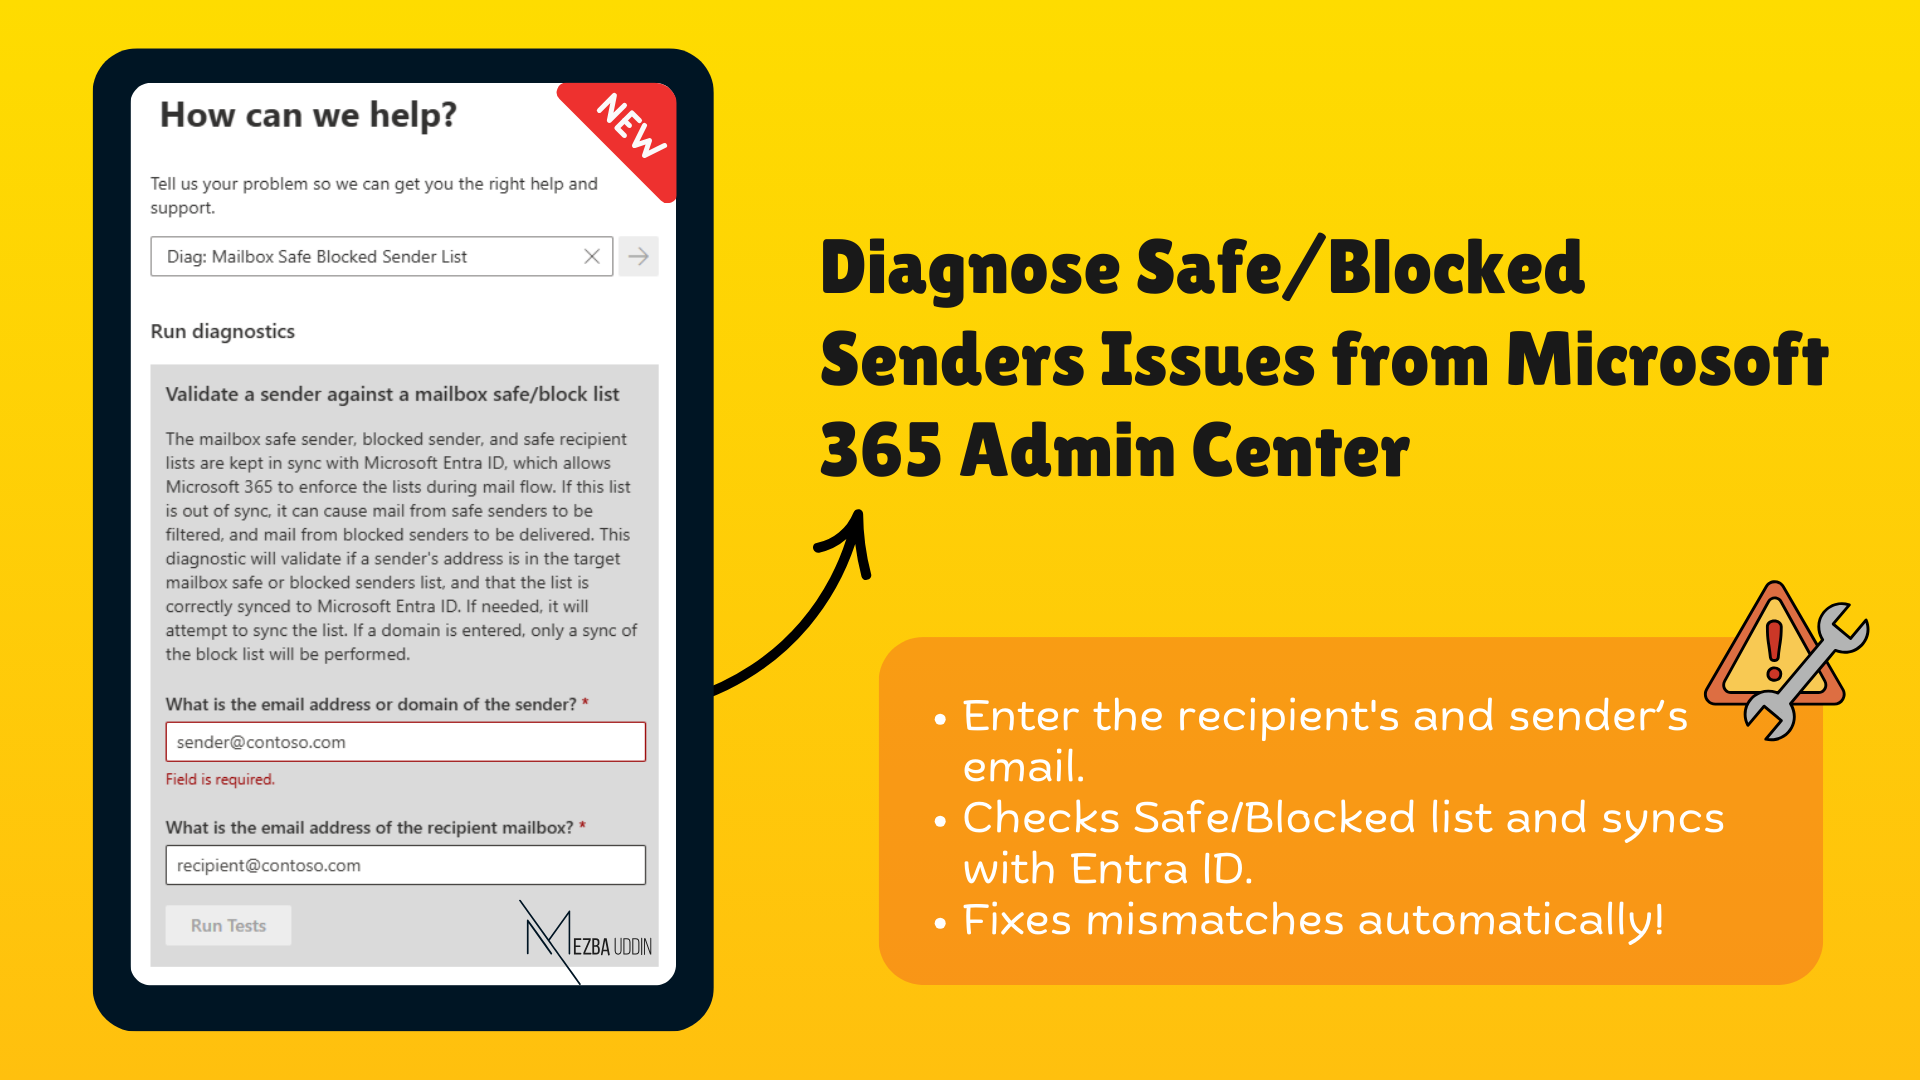
The Mailbox Safe/Blocked Sender List Diagnostic tool can be used to troubleshoot sender allow/block issues in Microsoft 365—quick, easy, and no fuss.
You don’t need to dig through logs or run complex PowerShell cmdlets to figure out what went wrong!
Here’s how it works: It uses the Get-MailboxJunkEmailConfiguration PowerShell cmdlet under the hood to give you detailed insights into whether a sender’s email address or domain is listed in a recipient’s safe or blocked senders list.
If you’re an Exchange Online user, it gets even better. The tool checks these lists against Microsoft Entra ID (formerly Azure AD) to spot any mismatches—and if it finds any, it kicks off a synchronization to fix them for you.
With this diagnostic tool, you can:
- Confirm whether a sender is allowed or blocked for a recipient.
- Identify syncing issues with Microsoft Entra ID that might be causing inaccurate allow/block lists.
- Analyzes your email flow, policies, transport rules, and spam filters to give you a clear picture of what’s happening.
- Automatically sync safe/block lists to the hash values in Microsoft Entra ID when discrepancies are found.
- Identify configuration issues, like oversized lists, that might prevent successful syncing.
Whether you’re dealing with a single email address or an entire domain, this tool ensures your Safe/Blocked Sender lists are always accurate and up-to-date. It’s a straightforward way to keep your email flow secure and your troubleshooting stress-free.
How to Validate a Sender Against a Mailbox Safe/block List?
For all you hands-on folks, here’s how to use the Mailbox Safe/Blocked Sender List Diagnostic tool. I’ll even show a real-world scenarios to show how it works in action.
First things first, you’ll need to be a global admin, Exchange admin, or Help Desk admin to run the Mailbox Safe/Blocked List diagnostic. You can access it through any admin portal, like the Microsoft 365 Admin Center, Defender XDR, or the Exchange Admin Center.
Now, you’ll need to provide two things:
- Recipient email address: Whose mailbox are we investigating?
- Sender email address or domain: Whose emails are causing trouble?
For this walkthrough, I’ll be using the Microsoft 365 Admin Center.
- Open the Microsoft 365 Admin Center and click on “Get Help.”
- Enter the recipient’s email address and the sender’s email address or domain. This lets the tool check if the sender’s SMTP address is on the recipient’s trusted or blocked senders list—or if there are any discrepancies in Microsoft Entra ID.
- The tool will generate a detailed report, showing you exactly what went wrong and how to fix it.
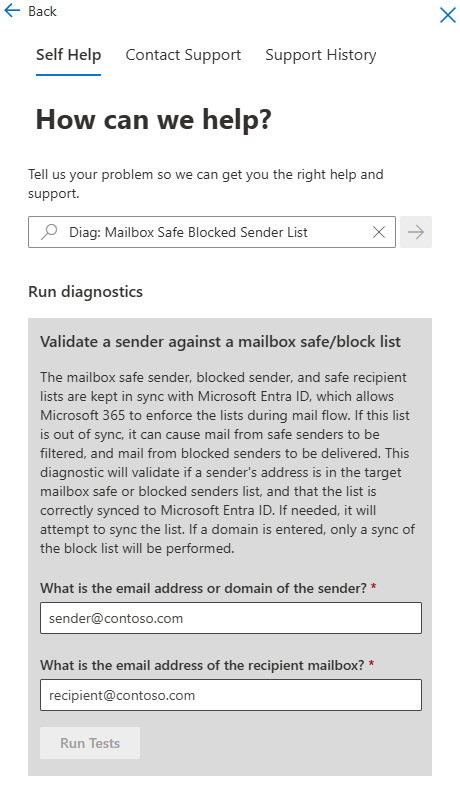
Real-World Use Case: The Mysterious Sync Failure:
Let’s say Sarah from marketing added marketing@trustedpartner.com to her Safe Senders list, but their emails still get marked as spam. Why?
How the Diagnostic Helps:
- Input the info: You enter Sarah’s email address and the sender’s email address (marketing@trustedpartner.com).
- The tool checks her mailbox’s SafeSenders list and the corresponding hash in Entra ID.
- Aha! It finds a sync issue. Sarah’s mailbox says “allow,” but Entra ID hasn’t updated yet.
- The tool automatically triggers a sync to update Entra ID.
See? That wasn’t so hard! So, the next time someone freaks out because they’re missing crucial emails, you can confidently say, “I’ve got a tool for that!” 😎
Head over to the Microsoft 365 Admin Center and give it a try. Lemme know in the comments how it goes!

